Monday, May 16, 2016

The Professor's 36er


Well, despite its size, this bike slipped out the door last month without me getting any pictures of it.  So when I got the invite over to the Professor's house last weekend to take some pictures of his historical artifacts including his new bike I jumped on over.   Here you have it better late than never: the largest Moustache to date....36" wheels, 27" of top tube, 30+" cruiser bars and nearly a 900mm saddle height.

A bike this size is best viewed through a comparative lens, so for full effect click on the images for the slide show.


 Tall man stands next to a large bicycle...


Man of above average height stands next to large bicycle.


Tall man rides large bicycle....


Man of above average height attempts to ride large bicycle.


29" wheeled bike made for tall man buried behind Professor's new Moustache 36er.

Tall man shows gratitude toward maker of Moustache; maker feels like palmed basketball.

Ride impressions?:  Well I think now just about everybody on the NAU campus has seen or been run down by this guy and his new... thing... with a crooked smile on his face as he drives the crowd.  A lucky few in the friends circle have been fortunate enough to ride it.  Smiles all around of course, but from my few moments before it left the barn:  this thing is a train in more ways than one...(good thing the Professor likes trains); it steers like its on rails and momentum is key.  All laws of physics apply:  ....an object in motion....F=ma....for every action there is an equal and opposite reaction.  The gyroscopic effect of those wheels is noticeable, at least to a guy of above average height and below average mass (figures based on US National averages for height and weight).  The whole platform is one of much intrigue, and now with one down I welcome the next one.  For those over 6'6" or so this is a real and viable option for a custom bike.  The whole package came together quite nicely for the Professor at 6'9".  I would be curious to spend a bit of time on one my size as well (hey we can all dream can't we?).

Mike, your spirited involvement in this project made it truly a pleasure.  Please enjoy this bicycle for a long time to come.  Thank you for the project!


History Lesson:  Sound Mechanics of the 1900s

The Professor was kind enough to invite me in to see (and hear) some relics of his archive over a hundred years old.  As a moonlighting musician that's been working on an album with a full band, and as a bike builder and aspiring machiner, it was interesting to hear how this was done in the first era of recording, as well as watch the result.


 The Edison Home Phonograph of design by inventor Thomas A Edison (yes, that Edison).  Patents on the picture below date between 1896 and 1906; this machine is of the later creation.  I'll do my best effort to set the stage and repeat what was described to me, but my brain has never been one for retaining dates, let alone factoids.  Electricity has been harnessed and Edison has already invented the network through which it is being distributed (1870s).  Most of this distribution though is to commercial interests in major cities and it seems most homes did not have electricity until the 1920s if not later.  Radio has been "discovered" but yet to be "invented" (Guglielmo Marconi is given popular credit for this in 1902 after more than 80 years of discovery and advancement in the filed, and the first radio broadcasts of human voice did not occur until 1916).  So the phonograph is a machine for mechanically reproducing sound, and without a doubt an item of luxury at this time.


Without electricity this machine uses a spring loaded wind up with weighted controllers to produce a spin of a certain RPM. .  I would have to think that the devices regulating the final RPM of the player spindle would represent advanced machining of the day.  The drive mechanisms sit in the box below the feed and amplifier.  The record is tracked with the slide at the rear of the machine.  The two arms extending off the slide serve as the tracking feed for the record and the play back.  This machine tracks off a metal fine pitch screw (above in the immediate foreground) rather than directly off the record.  Playback is direct amplification of the needle through a horn of varying size.  Below the small cone is sitting behind the player itself, and a large cone is attached to the player in the picture.

Records for this machine were cylindrical and each play will degrade the sound quality.  A record contains a single track.  Below the Professor shows off his extensive collection.  These days a track could rival i-tunes in best price or make the record companies jealous at their margins alike.  Tracks for your 1900s era Edison player could range between $0.30 and $300.00. 

The recording process of the time would have been quite interesting.  An artist would have to go into the Orange, N.J. studio to record the track in a single take.  The process was mechanical and the sound of the room would be carved into a wax mold by whatever device.  No separation of instruments, no over-dubs.  Now you have essentially a lost-wax casting process in play.  The wax mold is turned to a steel transfer for production of the final product.


Content of the songs tend represent interests of the time, so there is a lot of western themes with cowboys and Indians.  There is also, interestingly, or maybe not, a lot of subtle and not-so subtle over-tones of white privilege.  The track below is by Billy Murry with the music by the Edison House Quartet.  You can listen through the UCSB cylinder archive, and there is much more detailed information here as well.  I was unable to play the track directly but the download worked.  Ida-Ho!


With direct amplification, sound quality becomes more noticeable with speaker size.  This large cone is not something you want to be drug out of your costume closet.  When in use it would be hung from a single point at a balance as the small end of the taper needs to be able to move freely with the player needle.


The Professor's personal digitization efforts.  This part I like particularly well.  Blending the old and the new through a simple functional device.  Direct amplification of digital sound.  Thanks for the tour of the archive, el Professor!


Saturday, April 09, 2016

Dapper Dasher

I've been mixing two or more projects this winter...well...tow major projects and I can never keep track of how many minor projects, but you've likely read about some of them if you follow along here, and plenty of these minor projects are just small steps in advancing the greater offerings of the Moustache Shop.  I posted about the plate crown fork several months back as it was an accomplishment in retro-technology and the first step in building up the Dapper Dasher.  A little background is due here:


Dapper Dre is the one character I know that has the whims of our city wrapped around his finger.  The city makes a move towards progress and development, Dre has been waiting at the corner for this very moment to throw mud in her face with a smug grin and then roll in it right along side her.  He exists symbiotically with a city trying to grow despite its many constraints.  His lifestyle has grown from simple but ridiculous events that light a fire underneath the public to bring out their best both in dress and in character to inspiring our public through his antics on both on stage and on the internet.  His enterprises have grown from famed purveyor of costume attire to celebrity entertainer, but nothing has been left behind.  The wave of Dapper Dre is growing in intensity.  I never took Dre as the custom bike type, but Dre has not owned a car in the ten years I've known him.  This bike is not my typical commission, its the bike to carry a vintage lifestyle into the great unknown space of the future.  Traveller of retro-space.  Class was to be considered on all fronts.


After the plate crown fork, the frame was a sigh of relief: simple diamond frame for modern accoutrements like 650B wheels with disc brakes.  Everything you wanted in 1985 but maybe didn't know about.  Room for 45mm tires with fenders or 2.2" tires without.  Northern Arizona is a rocky place, even if you're just on a commute.  The position is one for comfort over the long haul, and with back pain riders like to be upright, so the cruiser bar project came about mid-build and has proved a worthy endeavor.  The handling is stable and predictable thanks to the slack angles, upright position, a long rake fork, and a high-ish bottom bracket keeps pedals off the rocks when travel turns to raw earth.  


Space Junk.


Bikes work out best when there is a cohesive plan from the inception and this one had it right down to the color scheme.  Burgundy with copper accents, silver and black components mix meeting at the crankset.  The burgundy color was achieved by putting down a sparkly layer of cosmic blue with a candy red top coat.  You can see the blue coming out with the tap.  Certain lights bring out the combination as a vibrant purple.  Remember your color mixtures kids.


The build for this bike had to match the rider's taste for vintage.  I chose to represent this with the best parts available from all times past and present.  The wheels are 36 hole Velocity Atlas touring rims in polished aluminum laced to my favorite: Hadley Hubs with Phil Wood custom cut spokes.  The hubs use Hadley's ti-bolt option in the rear for future adaptability in a potential trailer project with a traditional 9mm QR in the front and a bolt on skewer.  These hubs are brilliant, with excellent machining throughout, quick 72-point engagement from the titanium freehub body, adjustable bearing preload and simplicity in rebuiling.  The choice between shimano and sram xd drivers is also available. For this project we went with the Shimano option for back compatiblity with the NOS 8 speed m900 12-32 tooth cassette.  Oh yes!  This piece was matched to gray XTR derailleurs and mated to Suntour XC Pro top mount shifters.  The best in vintage mountain bike drivetrains.


Further rounding out the build are Honjo aluminum fenders, Rivendell Fatty Rumpkin tires, Avid BB7 brakes with Speed Dial Ultimate levers.  If you're questioning the brakes, think about this:  before these came along you had the option of Hayes 22mm post mount hydraulics that were finicky at best...these brakes eased the transition from rim brakes to hydraulic discs in a simple and elegant manner that was easy for any average joe to grasp.  Paul components just now released a disc brake that is functionally a clone of this design that dates back, what, 16 years?  I'd say that's pretty timeless.


The rest of it was accomplished with a White Industries double crankset with a 26/40 tooth ring combo attached to a Phil Wood square taper bottom bracket.  Should be service free for at least the next five years, probably more like ten or fifteen.  Headset is a Cane Creek 110, and Thomson supplies the seatpost and BMX stem.  The seat is a Brooks kevlar and rubber model.


The racks were created to match the overall theme with wood inlays reminiscent of a flatbed pickup from the '60s.  The rear will accommodate standard panniers from any number of makers while the front is more aimed at a large cargo like a trunk.


Upon receiving this bicycle, Dapper Dre turned up in production mode, cameras rolling.  The bike was unveiled from beneath a tarp and christened with the bubbly.  Champagne was sprayed about, coating that lovely red finish before being licked off by the man himself.  A hilarious spectacle.  Pee-wee quotes were quoted, and circles were ridden.  "Its not for sale Francis"

Wednesday, March 23, 2016

Stock Parts....


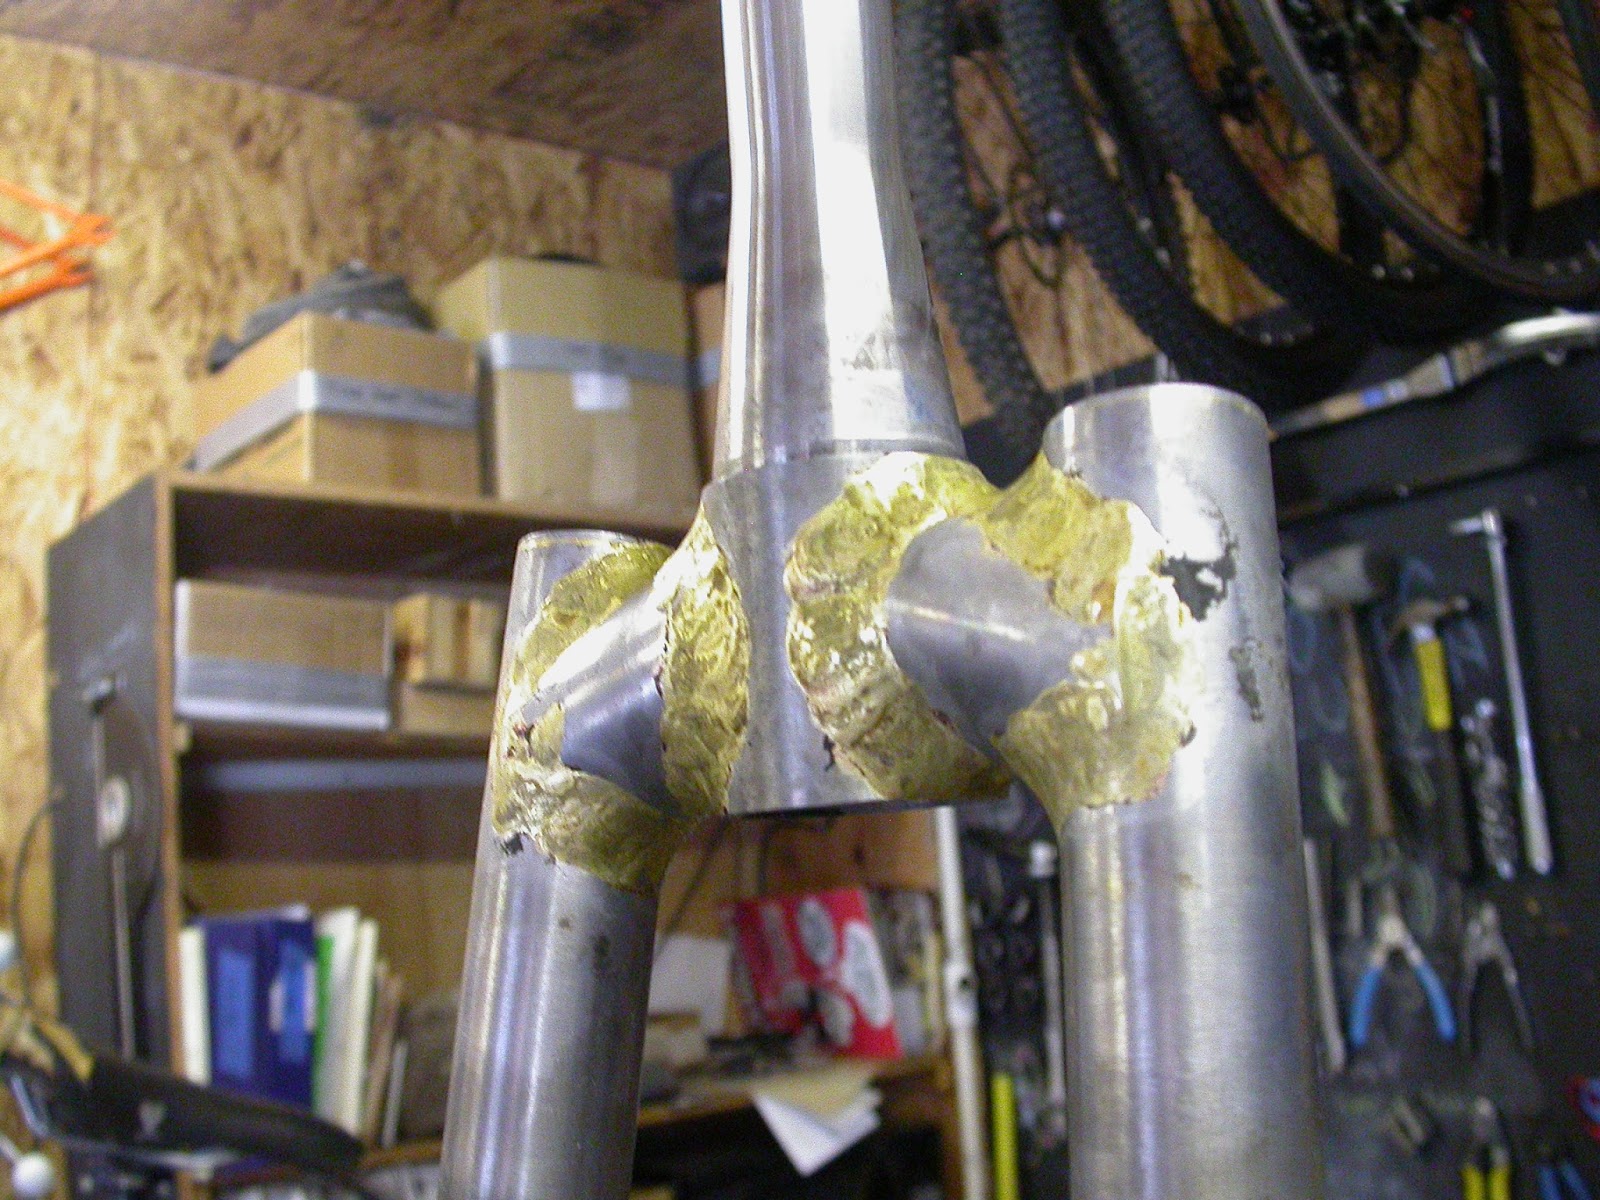
....Blockhead.  I needed some fork ends that would take a way oversize piece of straight gauge as a fork blade and a 10mm axle.  The yarder is running a rear hub for a front hub.  Nothing really seemed to fit the bill so I machined these little pieces out of some 4130 plate.  Quite simple really.  8 corners, 90 degree angles.  They line up the blade with ample room for the disc rotor and there's enough space left over in the miter to manipulate the spread of the crown a bit.  Brass is sweat both inside and outside the fork blade and the rest is capped.  I'll get a good picture of the finished product before its all gone, but have neglected to so far.


One Paragon item I never thought I'd use is their tapered steerer (MS2009).  It is a beautifully machined piece of 4130 with relief internally to match the transfer of stress loads of a fork flexing from bump and brake into the steerer and headset and on into the main triangle.  In my mind it has seemed excessive in most rigid bike applications versus a straight steerer.  I find a straight 1.125" steerer, or for increased braking demands a externally tapered steerer for a 1.125" headset (MS2026 or my own made) more appropriate for brazing a unicrown or segment crown fork for most bicycles (meaning up to a 29" tire and 3" width or less).  Increased leverage from added length of the fork blades on the 36er coupled with a 200mm disc rotor creates a need for extra strength in the fork crown and the tapered steerer is up for the task.  The crown tubing pieces wrap the fork blades and in this case approach the size of the steerer base.  Tube diameter and wall thickness are a crescendo of sorts, growing thicker towards the top.  All told the 9 inches of steerer tube stack will most likely remain its full length when the build is complete.


Thursday, February 18, 2016

Project 787

....No this isn't the introduction of carbon into the materials list as the commercial jet manufacturer did with their similarly titled project.  It is however in reference to the size of the project, namely the BSD.  While the aforementioned jet manufacturer likely felt similar about their project in size and scale, they are a large corporation with substantial public holding and an infrastructure that occupies the better part of a major world city; I am a guy with an impoverished affinity for tools, access to a 300 square foot shop, and the desire to make awesome bikes for people.  So to talk about the scale of this project being let's say... similar to that of the jet company... is likely the greatest understatement of the day.


Now, I'm not really one for novelty bikes or fad, I hope my work to date speaks to that, I generally try to talk folks out of ideas that I would think to be less than good.  There have been plenty of over the top requests that I have flat out declined before even considering the time involved or final price.  More often though people's ideas are really just based in that of a good riding bicycle, but muddled with the latest hype.  With a little direction and specificity their dream is easy enough to achieve.


My ongoing email conversation with the Professor is as of typing this: 70 emails long.  70 emails with little more than a wheelset to show for it.  The conversation started clear back in September with the subject line "Big Bike,"  to which the Professor briefly introduced himself (as a sizeable figure that, well, let's just say Lebron James would look up to), his well worn bike collection (that included a couple other customs), and his desire (Big Bike).  He concluded by asking if I would be interested in meeting up for further conversation.  I obliged.  I had never really considered making a 36er before, nor what would go into doing so, but this proposal was 100% necessity.  The rest is me nit-picking the details of every imaginable element that could possibly be conjured into, onto, or beside a two-wheeled structure.  For the Professor, this is an object of necessity, he dwarfs his current 29er.

A good bike build starts with the hubs in hand, and with a BSD of 787 mm, and a rider weight of 285 lbs, nothing can be overlooked.  I turned to Phil Wood for the hubset... err... most of the parts of what would ultimately become the hubset.  The snow bike front hub 135 mm OLD and tandem rear hub 145 mm OLD were the last ones sitting on the shelf in 36 hole drilling.  These will work.  The reason for these hubs is the wider flange spacing allowing a similar spoke angle (flange to rim) to that of a 29er, even though the radius is nearly 3.5 inches larger:  stability.   With the hubs in hand I began to realize that the quick release configuration these were sent with just wouldn't do, so I went about turning new stainless axle ends for an in-house bolt on conversion since PW didn't have the parts.  The cool thing about these hubs is the axle is the same regardless of configuration and is internally threaded M8 x 1.25mm.  Spacers threaded onto the axle O.D. handle the interface with the frame and the location between the dropouts.  I took this opportunity to align the snow bike front hub to rear disc spacing.  This better centers the flanges and gives better disc rotor to fork blade clearance.  Onto wheel building.


Being that this is a bike built on unicycle parts there are some things to keep in mind... namely limited parts selection.  There are these rims, maybe another choice, that lace to a choice of two or three hubs (crank attached via ISIS interface), with your choice of three lengths of 14 gauge spokes in 5 mm increments*.  Hardly a wheel builder's dream world.  With my hubs already in hand I had failed to consider the option most closely resembling the dimensions of the unicycle hubs.  Hub choice for my criteria above was already quite limited.  What came next was a wheel builder's dilemma, how to resolve making up the differences in spoke length not covered by the sizes available.  I'll let those of you still reading stew your options here.

*if anyone reading has a source for blank spokes in the 380mm range I'm all ears*


Alongside all this is the now emerging problem that none of this bike will fit my existing tooling.  From wheels and beyond, this bike is the tool-maker's project.  The goal for the rest of it is to keep things as simple as possible, but a compiled tool's built photo for this project is definitely in order.  First off, the truing stand got a 5 inch lift kit....


...As did the dishing tool get an extension.

The project is now moving into the metalwork phase with a tensioned wheelset.  The front is based on a rear MTB hub spacing and 10mm axle for strength and future compatibility; the tandem spaced rear is laced offset 4.5 mm to the drive side equalizing spoke tension between hub flanges and favorably bumping the chainline; the frame will be built to accommodate.  Gear inch calculations are amplified through the large diameter wheel so a 11-36t ten speed cassette will be used along with a 28t BMX sprocket.  Everything parts wise will be chosen from the "tried and true."  To be continued...

Sunday, January 31, 2016

Frosty Winters

Frosty Winters are the Flagstaff way, not always accompanied by snow but sometimes, and between winter storms are periods of nagging cold and freeze thaw glaciation that render most outside activity next to impossible save for morning ice running.  It reminds me of the opening scenes of The Empire Strikes Back when the Rebel Alliance has fled to the Hoth system.  Even our savior to the south, Sedona, has been plagued with red mud and for the most part un-rideable.  Like winters of old so I'm told.  Maybe I should look into acquiring a tan-tan.  And so it hit me the other night while staring off at the stickers on my guitar case waiting for show-time at the Monte Vista Lounge.  10 years.  10 years in Flagstaff.  10 years of Frosty Winters being bailed out by world-class mountain biking one town over. 10 years ago to the night Friday night I rolled into a town on a Frosty Winter night to make a new home and start a new job at the Arizona Conservation Corps.  When I first arrived I grabbed a forest map and a burrito before heading to the first beer joint I could find and catching a local act, Gravy, before nestling down in the back of the Space Cruiser on an open forest road that shown no signs of winter, no place to go but the forest.  I was a true HOBO in every regard.  The burrito was sub-par, the beer down-right terrible, and the music left plenty to be desired...not my thing to say the least.  A few days later work had begun and I had resolved that I could probably spend the year in Flagstaff before moving on to the next great spot.  Well ten years later....

I can imagine no better way of spending the ten year anniversary of my residence in Flagstaff than playing a show at the Monte V.  Many Friday nights of my earlier years were spent wrecking my eardrums at the V.  To be on the stage this night was remarkable.  The crowd: amazing.  A lot has changed in this fair town in the last ten years.  The beer is good these days, at least some of it is, the music scene rivals any other small western town, and the mexican food is, well, incredible.  If I knew ten years ago that we would be riding the bikes we now ride the ways we now ride them, I'd have been in awe.  I distinctly remember resenting half of the trails I now LOVE.  Living here has brought me to a new understanding of bikes and what they can and should do, so I say to the people of my adopted home:  THANK YOU!  Thanks, for having me, teaching me, and showing me your ways, for embracing the eccentrics and keeping us all in such good company.

Frosty Winters (the bike) is as much of an contradiction as winter in Arizona.  Its owner, whose namesake the bike takes, is not frosty at all, quite friendly really, and the bike will no doubt see more long summer days than anything else.  This frame features the latest blend of machined metal turned into performance ride traits aimed at taking its pilot closer to the edge more comfortably than ever before.  Its dressed up in a two coat powder job of Chameleon Teal over Ink Black marvelously executed by Mountain Shine Coatings.  Really the photos do the paint no justice at all, as it shifts shade quite a bit in varying light.  Reminds me of my old Klein Q-pro...better perhaps.  The paint looks straight black, but the sparkles shift from green to blue to purple and given the right low angle light, the bike just radiates violet.


Basics specs for this ride are for 130mm travel MRP fork, 29x2.4" tires, chainstays in the 425mm ball park, 142x12 thru axle, dedicated 1x drivetrain, 30.9 dropper post with external top tube routing....the preferred way in these parts.


Some details of the in-house yoke that make this bike possible.  I'd say its the favorite method I've used to date.  It uses thicker plate than before but the relief keeps the weight identical and the hollow brace reduces weight further while stiffening the whole assembly.  


Legend has it that within the first fifteen minutes of riding, this bike had already saved its owner when a low light A-line was unexpectedly piled with debris in the ongoing user group land battle leaving the only one option:  PULL UP.  The impending crash was thwarted.  Its tales like this and plenty of others that make me psyched to keep this effort going!  Moustache RIDES!  Thanks for the project Frosty.  Enjoy the ride!


Friday, January 22, 2016

Cruiser Bars, Riser Bars, and Compound Bends

I've been mulling this one over for a while now.  Several years.  I've made various efforts towards compound bends with chainstays over the past couple years, mostly rotating by eye or with an angle finder and producing a fair bit of scrap metal in the effort.  Handlebars really put your bending skills to the test.  And the came to step up and pass the test.  Commercial handlebar offerings don't meet the needs of the next two works in progress, and the one guy that makes such an appropriate product I guess isn't much for email.  So my hand was forced,  Lemmy died, and I'm throwing All the Aces.  I'm taking cruiser bars and riser bars on at the custom level.  Custom rise, custom sweep, custom width, custom comfort, 7/8" clamp cause its the BMX standard, unchanged.


Of course tooling updates were in order.  But I wanted to try things out a bit first before fully committing to a new bender.  I have a design fairly worked out in my head, but that's still a far cry from having a working unit in hand, so I figured the prudent thing to do here for time sake was update the ol' Handy 7/8" bender once again.  The ol' Handy has been $100 well spent.  It came from ebay in 2010 and since this picutre has been through several updates to improve its performance.  Its design flaws show a bit in thin wall tubing, but it has facilitated nearly all my learning of bending mechanics.  It is shown below with the first clamp mod.  For this project the clamp was scrapped in favor of a new one...imagine!


With the new parts in hand several bars were drawn out, raw lengths calculated, and the bends made sequentially.  As for the rest of the details, well, I've got to leave you something to think about.  I will say that by far the hardest problem that I'm still trying to wrap my head around is the vector math involved in creating a three dimensional part.  I got stumped several times on paper before taking the try and see approach to prototyping.  I'll continue to pursue the magic formula, but for now the bars are straight (left and right grip area are parallel on the surface plate, and the clamp surface is flat when the ends are touching), and the bends are even and symmetrical.  This hand felt like a big win, but the game rolls on.