
Bike packing is all the rage these days....I guess that's what its called now. There are companies out there specifically taking on and marketing to people pursuing this activity. I've always just know this means of travel as "touring". Going for a tour means freedom from plans and embracing the unknown. Anything can happen. Your only resources are yourself and your buddies and what you have on hand in any given moment. To me "bikepacking" sounds like an activity based on a plan, but a Tour implies the pursuit of freedom from. I guess somewhere they meet in the middle and I suppose that middle is your vehicle. Your trusty (we hope) steed. I'm calling my new one "The Camper Special". You know, like a '72 Chevy: Reliable, servicable, maybe not the most efficient thing ever created, but it always got the job done without so much as a hiccup, it probably even left you surprised once or twice about what you just got through. The Camper Special was a parts and trim package offered by big three American auto manufacturers on their heavier 3/4 and 1 ton pickups from the early 1960s to the late 1980s. Heavy Haulers. Typically trucks bearing the camper special emblem had two-tone paint, upgraded brakes, axles, and wiring for towing or a drop-in tailgate camper shell. Following in the footsteps dredged by internal combustion Americana, the Camper Special (bike) replaces a fuel hungry V-8 with an appetite for adventure and heavy human-powered hauling.

Conceptually this personal project has been in the works for over two years, but if you've been following along here over any length of time I'm sure there is evidence of many of the concepts in play coming into fruition well earlier than that. Selection of parts and frame interface components was directed at keeping a functional timelessness to the package, as well as the ability for everything on the bike to just plain last under performance. It has been my hope in the design to create a fully rigid bike that is equally at home maintaining comfort and strength on loaded multi-day, multi-week tours as it is on the gnarliest gravity-fed single-track northern Arizona has to offer. Control and efficiency are the primary concerns here rather than speed. Slow is smooth and smooth is fast.

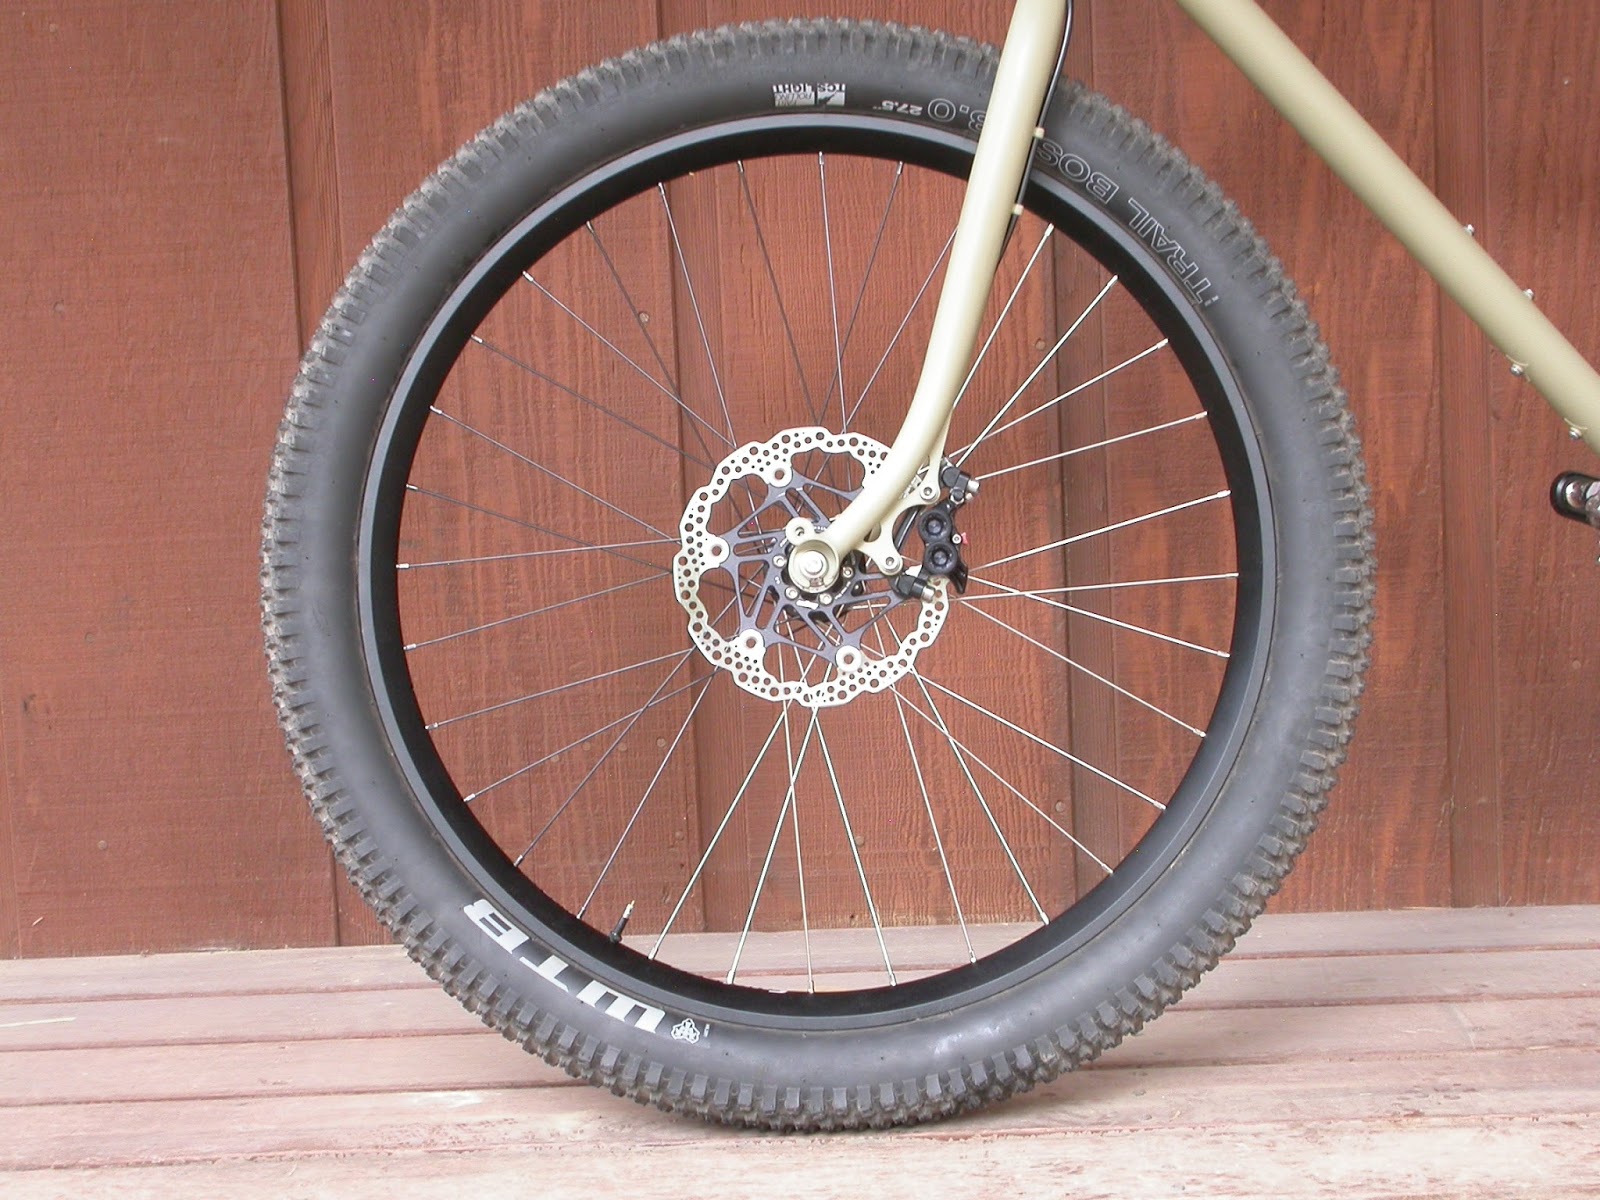
The result starts by utilizing 650B x 3.0" tires (you could call them "plus" tires) on a horizontal dropout short-stay frame for adjustability between lines of duty. The "Coco-Moto" dropouts (these are just lovely by the way) were pried from the very hands of Mr. Steve Garro himself as was one of his new custom drawn Columbus 38mm down tubes. Bolt-on hubs meant retaining a 135mm outer lock-nut dimension, so the rear wheel was laced with symmetrically between the hub flanges kicking the cassette body out 7mm to the drive side for proper chainline when matched to a boost crankset on a standard 73mm BSA threaded bottom bracket shell. The rear end of the frame is then built asymmetrically to accept this wheel. Tire clearance on the short (420mm minimum) chain stay is accomplished by a plate yoke milled in house and a curved seat tube rolled across town.


Parts spec is pretty standard for one of my personal builds....a mix of what I have around, what I know works, and what I want to try out. Race face cinch cranks get the nod for their flexiblity between 1x and 2x setups with proper chainline. Touring I would expect to run a 2x front ring with a fixed seatpost, daily riding with a 30T 1x and a dropper post. Drive train is 10 speed with X.0 gripshift, XT 36T cassette, and GX rear rock catcher. A Hope bottom bracket, 4 piston brakes, and floating rotors are spec'd to try out. Hadley hubs are laced to Syntace W40 rims with Trail Boss TCS tires. A Cane creek ZS 110 headset, Thomson BMX stem, and house-made riser bar finish out the build.

The dedicated rigid fork utilizes my own custom thick-walled,
externally-tapered steerer tube and raked blades at 50mm offset. Headset is straight 1-1/8" on a 44mm headtube allowing for a better join area to the 38mm downtube than would an external cup head tube. I have not embraced the 1-1/2" tapered steerer for steel rigid forks as this is an excessively heavy piece of metal that cuts down on the surface area of the blade miter at the crown. I
find the steerer tube with a diameter matched to that of the crown area
of the fork blade to be the most appropriate for brazing as the miter
of the blade then wraps the steerer tube rather than being attached only
to the side of it. The whole area is then flooded with molten bronze
creating a very strong joint. Again, this is a rigid specific bike so
swapping to other forks is not a consideration. Rigid specific is the only way I build my forks as there are just too many compromises in anything else: There are rigid bikes and there are suspension bikes....your choice, but the one bike that attempts to do both depending on the mood makes too many compromises to the ride of either bike's personality it is trying to emulate. Basically: Suspension correct is incorrect. This fork will, however, accept a 29"x3.0" tire and wheel if I ever wanted to try it, though after initial rides I think this combination would unfavorably influence the steer-ability and climbing of this bike.

When it comes to gear hauling on a bicycle, I'm a racks guy. Yes, there is the weight penalty. Yes, they're expensive. Yes, the soft packing setups these days are marvelous and if that's your thing, Great! To me though you just can't beat the stability and overflow capacity offered by a good set of racks. I accept the weight penalty. I've never known how to pack light anyway. I never know what I'm going to pick up at the next stop or where I might need to tie it on. The racks for this bike are derived from personal touring setups on trips to Mexico, the Cascades, and the Colorado Trail, and offer refinements to the systems used on these trips. I have always been a fan of the front (non-low-rider) panniers for how they balance the load and weight the front tire climbing. Most of your time on a bike and especially on tour is spent climbing so the longer you can spend pedaling your bike without getting off to walk the more efficient your use of calories will be. Every starting effort whether walking or pedaling with the kind of load I've been known to carry costs precious calories. If your bike is still tracking, you just need to keep the pedals turning. Easy enough, right. The pit-falls of front panniers can be their general poochiness and flop. Clips that aren't tight enough and attachment points that promote steering lag quickly degrade the benefits of where that weight is placed. This is all highly noticeable when the terrain turns rough. Everything secured to the front end of the bicycle should be as tight and as close to the steering axis as possible.


This rack takes those points and makes some accommodations. Clip on panniers are ditched in favor of standard 10 liter dry bags that are cradled by the rack then strapped to the side. The rack's attachment points at the dropouts and above the head tube promote flex of the stays and damping through the load being carried while cutting down on braking flex in the fork. The upper struts extending from the front platform serve to secure overflow loads to the steering axis without interfering with the cables. This can also be used as a means to attach your backpack in less demanding terrain, a much needed relief at times. The ability to transfer gear from body to bike depending on terrain is something to consider when heavy biking. Hiking a steep grade or mountain pass is the time to carry weight on your back rather than pushing it on your bike, cruising a dirt or pavement stretch is just the opposite. Your body will thank you.

The rear rack is a bit more of an experimental design in being a light weight top loader. I carry my bedroll here and pretty much nothing else. It could have been kept a bit more minimalistic, as my sleeping bag/pad weighs only around 5 pounds, but it seemed like a bit extra area for tie-ons would be useful leading to the lower structure below the platform. My thought in keeping the attachment points forward of the axle is allowing the flex at the attachment points and through the stays to provide some damping control to the rear of the bike through the load on the rack. The load carries its own inertia and in doing so works to resist the movement of the bike through the jarring of the rear wheel. All hardware is 6mm stainless and frame attachments are backed with nylock nuts. No attachment points directly on the frame or fork are threaded save for standard frame H20 boss placements, rear derailleur hanger, and bottom bracket shell.


I got the chance to take this bike on a shakedown ride for a week on the Kaibab North Section of the Arizona Trail, and since have managed a few rides on the trails around the shop. This bike is a blast to ride. I've found its confidence inspiring and feel as though I can hit the same downhill lines as with my 140mm hardtail at almost the same speed. Steering is still quick and playful as I'd have it and the vertical inputs maintain a lively response. Climbing is an improvement over that bike as expected. I haven't felt a rim hit on the front rim in a while. The tire pressure is a delicate balance on the TCS Lights and I'm thinking that I may favor some tires with a heavier casing down the road. I had been thinking that the rear tire would see some rapid sidewall wear with a frequent occurrence around here being threading a rear tire between sharp rocks. So far this hasn't seemed the case, but I have a 2.5" Breakout on stand-by.

An interesting point of discussion here for me is the stability of this
bike. It's not particularly low as I prefer pedal/chainring clearance
and a higher center of gravity, though maybe a bit lower than others
I've owned recently. Apples to oranges; BB drop is 39mm. This bike
hits a marked point of straight line stability at around 6 MPH. It'll
steer out of it when you want it to
keeping it fun. I would have to guess that a fair bit of this is the
volume and mass of the tires, but this bike stays glued to a straight
line like nothing I've ever ridden. I'm talking take your hands off the
handlebars on the washboards to take pictures kind of stability. Anyway, its been a new excitement to get this bike rolling and dialed in, and I'm looking forward to some extended adventures on it in the coming months. Thanks for following along....

No comments:
Post a Comment