The turnout of 10 brought a variety of backgrounds and experience levels to the plate and of the riders present only two or three had prior bike packing experience. Since the scenic aspects of the trail can be found in last year's blog post: "Touring the Black Canyon Trail", what follows will be more of a photographic reference of the bike packing setups on this trip, how they came to be, and their pros and cons. Most loads were cobbled together from stuff lying around in bike friendly garages. Riders were encouraged to buy nothing and make it work with what they had or could borrow.
It should be noted that at most we were carrying only a day's worth of food and water at a time, though caution to the wind does allow for carrying excess. Black Canyon Trail is about as easy as it gets in terms of a bike packing trip and allows for plentyful water sources in a wet winter (probably not so in other months), a restaurant detour featuring the state pie of AZ, and a convenient place to cache food and spirits if one were so inclined. All this adds up to a pretty light load on a heavy bike suitable to rookies and hacks alike.
Mr. Walker's Krampus: 29"+ Singlespeed Rigid. Revelate Seatbag. Full size tent and bedroll tied to handlebars. Medium pack.
Pros: Big Wheels crush all....mucho momentum. Balanced load.
Cons: None until you get into steep climbs or multi-day routes.
Richardo's Touring 29er 000 High & Tight Rust Bucket: Geared 29. Integrated Fork Rack with Jandd expandable panniers. Light Rear rack with bedroll tied on. Feed bag for convenient cold beverages when available. Light Pack for food and water. This is essentially the same setup I used for Colorado Trail last year.
Pros: Design refined over years of bike touring. Medium front load sticks into corners and handles great. Front bags absorb vibrations.
Cons: Bike Touring isn't Bike Packing. Awaiting the next incarnation.
Taxidermist Treadwell's Karate Monkey: Single Speed 29er. Homemade frame pack. Medium Seat Bag. Various handlebar attachments. Medium Pack. This is a pro looking setup for multi-day adventure, but this was the Taxidermist's first bike pack. He's hoping for an AZ trail run on this setup later this year. Shred well taxidermist.
Pros: use a setup like the taxidermist.
Cons: Well I'd want some gears, but that's me.
KP's Blizzard: 26" steel hardtail. Tubeless. Rear rack and panniers. Improvised handlebar bag tied on with cinch straps. Light Pack.
Pros: Plenty of storage. Why buy a handlebar bag??
Cons: Rear Panniers = heel rub, loose straps, poor weight placement, and unexpected drag on rocks.

This setup was all borrowed or improvised which is great for someone's first bike packing trip. It sets you back $0 and you can figure out what works and what doesn't. In this case more didn't work than would be desired. The rear road panniers had straps that could catch and drag on about anything the bags themselves did not scrape. KP's heels were constantly hitting the bags even though they were adjusted as rearward as possible. Despite all this....fun was still had.
KP^2's Giant: Smaller Full Squish 29er. Double Handlebar Bags, Medium to Large pack.
Pros: KP^2 made this work with minimal expense
Cons: Cable interference issues with handlebar mounted load. Specific tying pattern required.
This was KP^2's first ride on her new bike and the rigging embodies the spirit of "Intro to Bike Packing".
Trashbag Trudeau's Skunk-a-lope: 44 bikes custom 29" singlespeed. Small handlebar bag, small frame bag that still allows 2 water bottles. Medium seat bag. Heavy Trudeau Forestry Trash Pack.
Pros: This heavy bike rides more or less "normal".
Cons: Heavy packs are rough on your bones. Especially the ones you sit on.

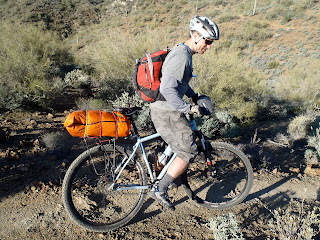
Kukulkan: Custom Moustache 26" hardtail. Rear Rack, Commuter Panniers and tied on stuff sack. Medium Pack
Pros: Stuff she already had.
Cons: Rear only load throws handling...front wheel lightens and understeers causing rider to adapt.
The rear load can cause excessively "wobbly" steering leading to sketchy moments in sections that would otherwise be fine. In the photo below Mrs. Viking shows a face of added concentration riding beside a ledge on what would otherwise be a smooth trail.
Odin: Moustache Cycles custom Trials 29er. Rear rack. Adapted Motorcycle Panniers. Top Load Tie on. Medium to Heavy Pack.
Pros: The Viking can ride ANYTHING!
Cons: Rear load on a short wheelbase.
Mr. Wilson's Raleigh: 29" Singlespeed. Adapted Rear Rack. Stuff Sack tie on. Medium to heavy pack.
Pros: Great rookie bike packing setup. Nicely packed top mount stuff sack avoids drag and catching issues associated with panniers. Minimal Cost. Rack rigged to frame w/o tabs using disc tab, long bolts, washer, p-clips, custom seatpost clamp.
Cons: Rear weight bias. Rack rigged to frame not feasible for long term use.
For more info on the Black Canyon Trail go here:
http://www.bctaz.com/
For more info on Bike Packing and the like go here:
http://www.bikepacking.net/


