Oh Shit I said it.....or I typed it....right there in the title....the "P" word. Before long I'll be throwing around other lay terms like "boost" and all the other adverbs and adjectives surrounding all the dubious marketing brought to you by the likes of those that need to sell a few more bikes this year. Before I even realize I'll be answering the generally innocent question "Is that a boost plus bike?" with a perfectly frank "Yes." Dread. Terror. What has this webspace become?
Taking on this project was about as big of a pill for me to swallow as the marketing jargon of the present day industry. I'm sure there are bikes at least somewhat like this in size available on sales floors around the world, but when a smiling and excited customer standing 5'2" shows up wanting the full gamut of options whipped together in a trail-ready bikepacking format with maximal suspension travel, I tend to raise my eyebrow before agreeing to such a project. This one needed some research and design work up front to make sure all the requests would (quite literally) fit the order.
The order was for a bikepacking rig with 120mm front suspension, clearance for 27.5x2.8 (plus...there, see that!) tires, dropper post, rear rack provisions, 2x drivetrain, all while keeping the resulting frame as light as feasible for the duty load. Sounds quite a lot like the bikes I've been building of late until you start to consider that all these provisions must fit onto a frame whose rider is 5'2". The first consideration for me when taking on a project is ride quality. There can be no compromises here. If customer requests add up to a package that I think will in any way provide a less than stellar ride I say no...simple as that.
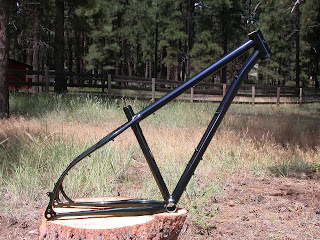
The first order of business was to measure her existing bike in a consultation setting and determine any changes that would be made. Her existing ride was a Small size Transition Scout. While it looked as though it was a lot of bike for her frame, she seemed to like it and a later ride would show me she was quite able to throw it around despite its heft. Next a scale drawing was rendered to make sure that a fork and wheel of that size would fit into Heidi's new cockpit with an appropriate bottom bracket height, seat angle, and handlebar position, while still having room to attach the top and down tubes to the head tube. For a given set of contact points, losing the rear suspension and travel reduces the available space for which to place a front triangle as the static bottom bracket height (and therefore the rider's height off the ground) is lower relative to the full suspension. Keeping all else equal, placing contact points onto the lower BB height eats up space in the head tube and I'd need at least 100mm of oversize head tube to join the top and down tubes. 120mm would be the max fork travel and would allow her to keep a handlebar level to her established saddle height using a flat bar and a 100mm head tube.
With the cockpit and contact points a go, I accepted the project. The details were far from being worked out, but as the parts were provided, one problem was solved at the time. Since the front end was established the rear end was the next to be considered. This is really the only part of the frame that is three dimensional, but all the parts specifications, bends, and tolerances need to add up exactly. After watching Heidi ride and considering how this bike was to be used, I determined that a short stay was not going to offer her the benefits that others may see. The yoke I use to tuck rear ends in tight and keep maximal tire clearance adds a half pound to the frame weight, and the benefits didn't outweigh the costs on this frame. The chainstay length could kept be the same as Heidi's existing bike without a yoke or curved seat tube, and the seat tube angle would be 3 degrees slacker (73 degrees instead of 76) placing her seated weight further toward the rear axle. This configuration at a horizontal chainstay of 425mm would allow plenty of clearance for a Maxxis 27.5 x 2.8" tire with a boost spaced double front chainring.
The boost spaced crankset was mated to a 157mm thru axle rear end to give the best possible chainline with slight favor to the lowest gears. When drawn out and measured the boost 148 rear hub is better served to give an improved chainline with a standard spaced crankset. How is this and who am I to make such a claim you might ask? Well, I measured the parts in hand...several times...and yes I saved my work. I feel a better explanation is due; perhaps another blog post is coming on, but in essence MTB chainlines haven't measured out to match between cranksets and cassettes since we ran 2.1" tires and square taper bottom brackets...
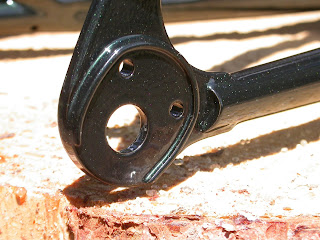
The rear end was assembled keeping a close eye on clearances. A large diameter and wide rear tire, a disc rotor, a double chainring crank, a front derailleur, a dropper seatpost, and a rear rack all need to fit into this space, and on this bike that space is a lot more compressed than on others. Plate style thru axle dropouts were chosen to keep overall rear end width to a minimum with the wider rear hub. The seat stays extend directly from the plane of the top tube and, as the seat tube is as short as it is, those stays attach a little more forward into the top tube than usual, maintaining the space for the seat stay bridge.
The finished product is what you see. The color fades from dark metallic blue at the head tube to dark metallic green at the dropout...and the finish was aced out by Nick at Mountain Shine Finishing here in Flagstaff. He's gotten really good with the fades. I sent Heidi out the door on this bike a few months ago, that ought to say how behind I am on these blog posts. She's been out shredding the west, but I had a chance to catch up with her this fall and to hear her thoughts about her new steed. Her first comment was, "Sometimes I forget which bike I'm riding." Well considering her other bike is a Transition Scout, I'll take that as high praise, THANK YOU! On a ride shortly thereafter, the review fell as the words "I love this thing!"
From my perspective: its rare that I get to make a bike in this size range, especially one that asks all the demands that this one did, and that said I have no personal tangible way of knowing how this bike will ride save for rider feedback. My designs originate from years (over 20 at this point) of studying bicycles, particularly mountain bikes, from comparative analyses of geometry tweaks between bikes or all sorts, and from watching riders ride bikes in demanding conditions. We can't push design forward without pushing limits of these machines in use, and with that evolution in machine comes evolution in the canvas of terrain. Today bikes (particularly hardtail bikes) are being ridden on terrain I would have never thought possible 20 years ago, or even 10 years ago, and Northern Arizona continues to open my eyes to what is possible on a bike. Thanks, Heidi for this project, and for allowing me to continue to push my limits as a builder.


