Wednesday, January 10, 2018

Krampstache V2.0


Y'all may remember the Krampstache from here back in late '13, or perhaps you first saw it when it got its 5 minutes this past spring when Ray derailed in LA and wheeled it into Radavist World Headquarters to have it packed before Kooking off in Aussieland.

That article can be reached HERE.

A little back story:

This bike was built shortly after Surly had gone out on yet another limb and introduced us all to its latest buzzword: "Plus Tires," and had given those early adopter types a bike to try it on, Krampus.  Ray snatched one up and in the subsequent months I had the opportunity to watch him ride it on a couple off-road multi-day routes.  I was impressed at how well that bike maintained its momentum and traction over things that would knock my 29er to a crawl.  But as with many production bikes the fit was off and there were some things about it that just didn't add up: why such a slack head tube angle on a bike that still needs to steer, why the insanely short head tube, why a suspension corrected fork with no option for suspension?  It was a jumping off point, and enough to convince Ray to have me make the next one around a more tour-minded stance.  The resulting build featured the only choice in tires available at the time, setup ghetto-tubeless (tape in sealant was still gaining momentum), and laced to Surly's abomination of a rim, the Rabbit Hole.  Again Choices were few.  The build was largely my choice of tried and true parts that the most skeptical cynic would trust.


While I was obviously thrilled to have my work featured where the geekiest of us all frequent for a bike I had made more than three years prior, the flurry of comments that followed displayed a little blemish that I sure didn't remember being there when the bike left the shop.  And even given the fact that the article produced more interest in subsequent rack production (sorry folks, I just can't chase one-offs around the globe for something *that* custom...only with a frame) than it did criticism, I just couldn't shake the bother that in the limelight that one little detail slipped through my fingers.

The comment was: "As awesome as it looks, I'm skeptical of the long term reliability of the rack/headset interface. The rack collar is not flush with the headset top in the photo and this is not going to improve with touring use." 

And there it was staring me in the face; 10th photo in the sequence.  I'd say the comment was pretty spot-on; I'd have those concerns if it were my bike.

It didn't leave the shop that way, no way.  It doesn't show in my fairly extensive photo record. I wanted to defend myself in the commentary in the very least, but my 9 year old lap top hasn't had a supported browser in at least four years and would allow none of this.  Neither would my cell phone so far into its life that it mainly ran on A/C Power.

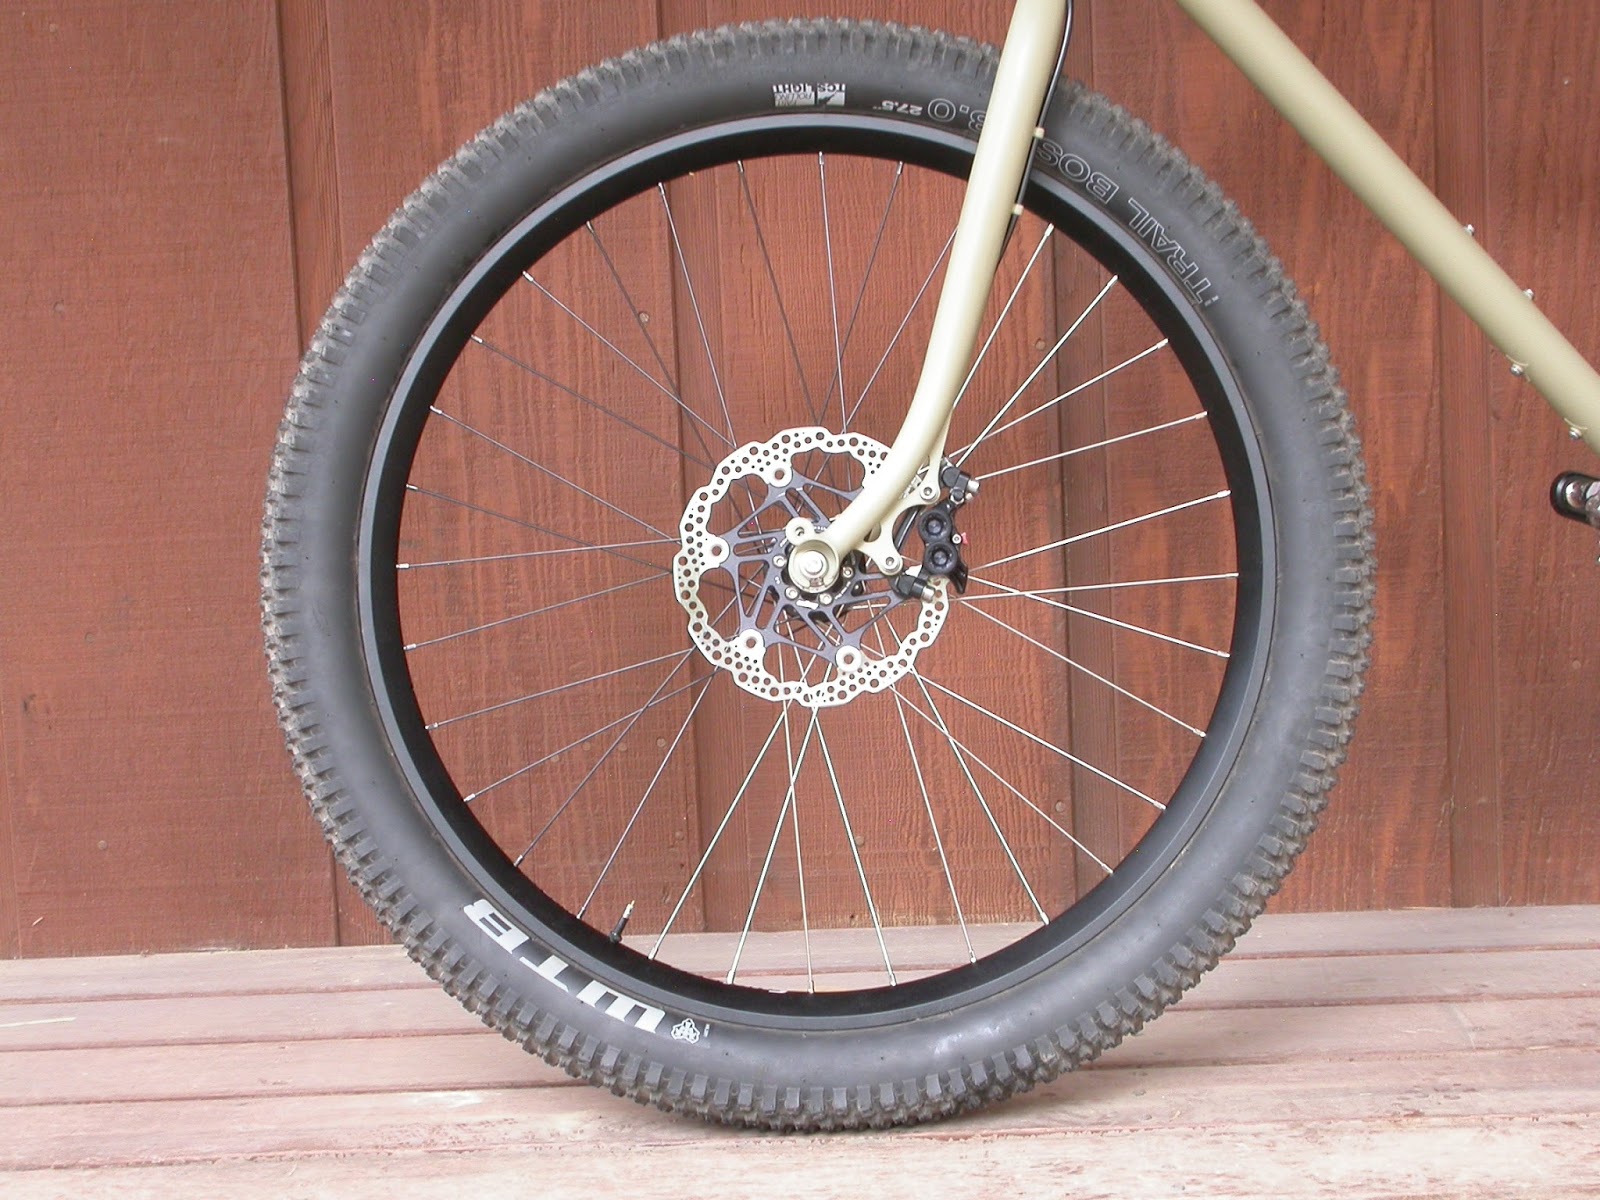
Needless to say Ray was off to tour down under and I was anxious to get my hands back on this bike.  When he returned we hatched a plan for a rebuild that would forward the existing steel platform into modern era with new wheels, a front generator hub with integrated light and usb charger, a 1x11 speed drivetrain, and some better, actually tubeless, rubber.  And finally I'd get to crack the mystery of the misaligned headset race.


The first thing I noticed upon pulling the stem cap was the star nut had pulled up.  Not likely the cause of our issue, but potentially a contributor in not allowing a proper headset adjustment.  This has been  something of a persistent difficulty with certain thinner wall --> larger I.D. steel steerers as it seems many star nuts are made for the thicker wall aluminum steerers.  A better suited replacement was installed. 


The second thing that caught my eye was the paint chipping away at the rack collar from the bottom (headset side).  This seemed quite unusual for something that should only butt against the top cap....

....unless it wasn't.


Ding. Ding. Ding.  There's the problem. The Cane Creek 110 headset leaves one thing to be desired in an otherwise great product.  For some reason they make this top cap to be compatible with their proprietary "Interloc" headset spacers.  Stupid.  This is no doubt a product of some overpaid engineer's mind; it goes a long way to solve a problem that simply doesn't exist, and takes it so far as wrapping it up in space food packaging commanding $5 a pop at lengths no greater than 5mm.  Now normal aluminum headset spacers would not typically be a problem here, but in the instance of the truss rack it uses thinner wall --> smaller O.D. 4130 than does the lighter aluminum counterpart, and was of just small enough outer diameter to start to slip inside the interlock groove, hence the paint wear.  Cane Creek "remedies" this condition on their 110 series headsets (but not their 40 series headsets) by providing this small but magical gold ring to fill the void, or as the case may be to be lost in the vacuum of time and space.  Ray's Tourer was missing that piece of magic for one reason or another.  Again, normally not a problem...


I had considered the binder bolt in the original construction of this rack but opted out thinking it would be unnecessary and that the clamping force from the headset adjustment would be enough to pinch that upper attachment, and that the binder would be unsightly and excessive.  I continued to consider it through subsequent rack builds, and finally I caved on the binder, retrofitting one to this original after deciding to do this to my personal rack this past year.


To paraphrase one commentator: the upper attachment of this truss assembly exists in part as a tie off point to eliminate the rotational swagger created by inertia of top loaded the gear under steering forces.  He understood completely.  It also helps to distribute the braking forces put into a 3 inch tire with a 180 pound rider and another 40-50 pounds of gear.  The more I pondered this the less the loose slip fit of the upper attachment as a headset spacer alone seemed to be sufficient at performing either task.  I have since opted for the binder.

Now for the upgrades:


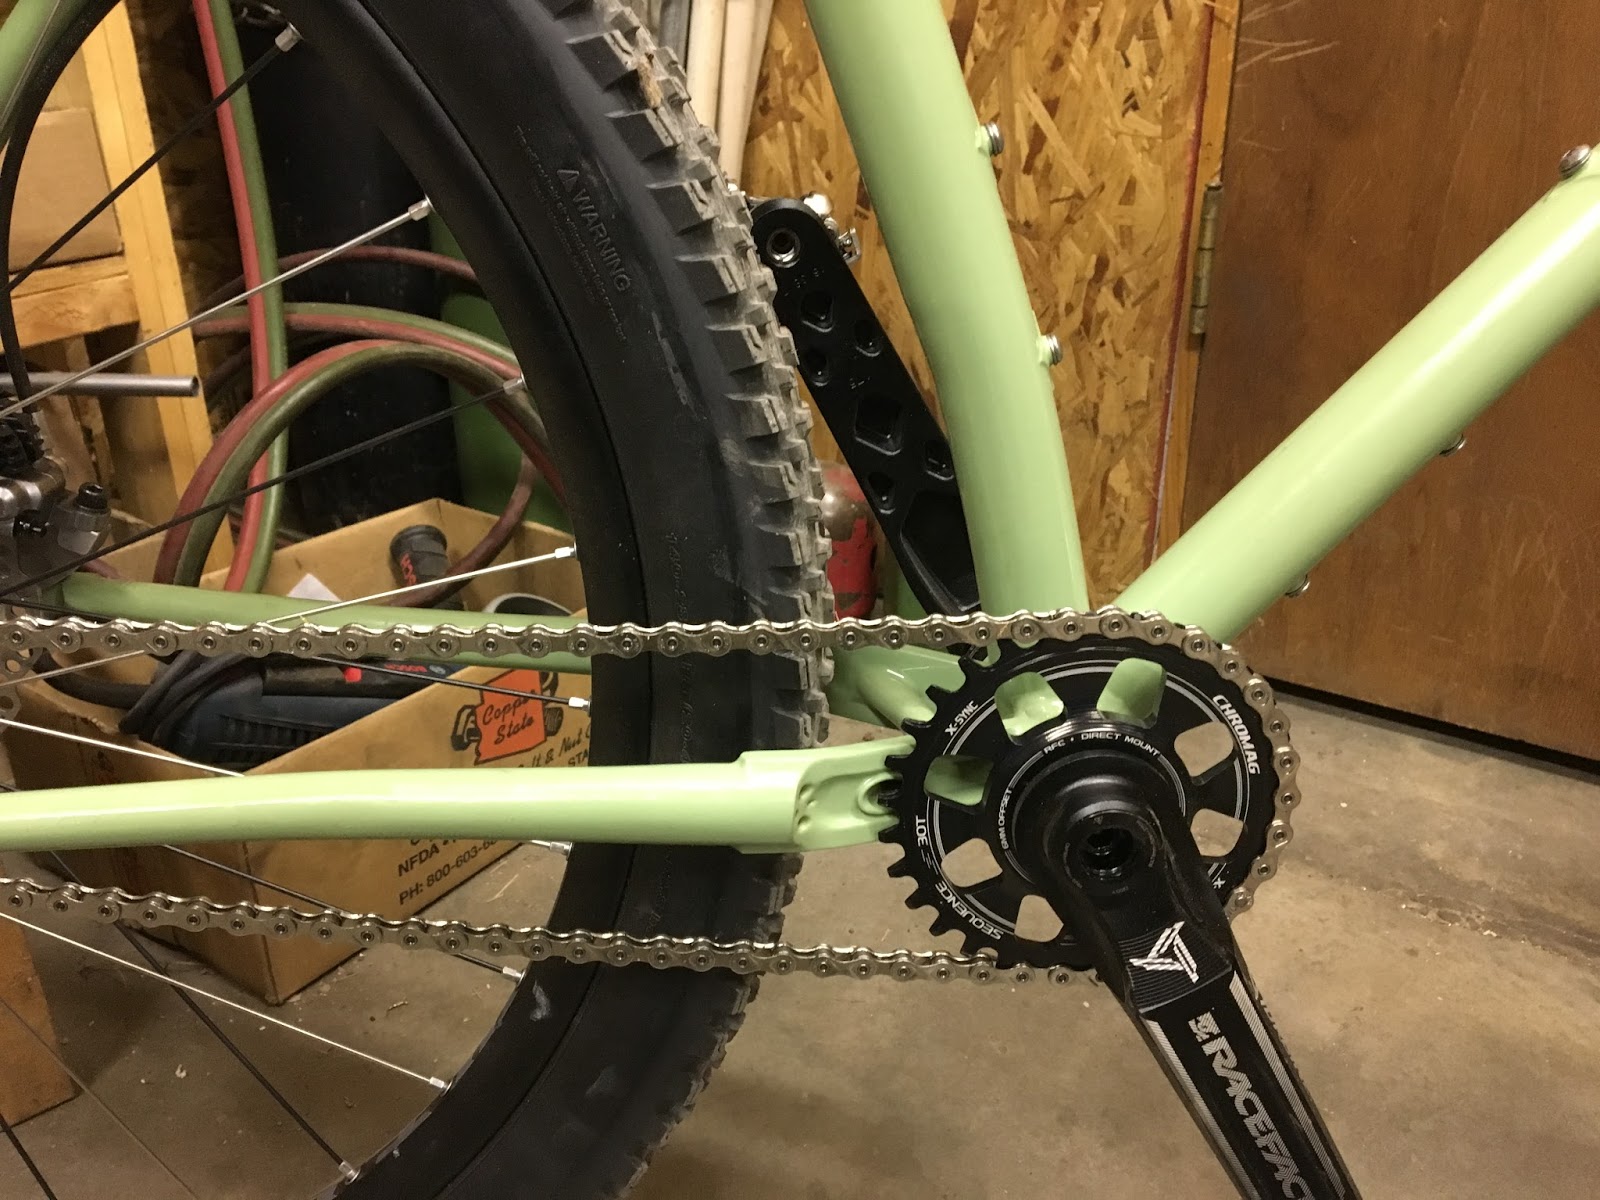
Ray and I liken this to the Pre-Runner Package.  New full floating rear axle with 11-50 wide range cassette, beefy tires for fast rolling in the dusty conditons, a baja style light bar, and a generator to power that stereo and run those lights.  The wheelset makes a remarkable difference in the responsiveness of the bike and all in all we landed pleasantly forward of where we started. The Kooks got the better of him down under, and well, kook on!


The Before:


The After:


Sunday, December 03, 2017

The Intern


Some years back...maybe 2011....2012, I found myself in a conversation at our monthly art walk with an interesting, pleasant member of our community.  Of course it was conversation about handmade bikes; in particular it was a bike he'd seen me riding one through his neck of the woods.  The "Rust Bucket" as its come to be known in its retirement days; my original frame from UBI nearly nine years ago; Rust Bucket was still in its prime, pre-Colorado Trail.  The gentleman was an enthusiast and an admirer of the handmade segment and he mentioned to me the conversation with his son about the desire to learn about this craft.  Come to think of it I'm not sure if the desire was his or his sons.  Before I recognized the words coming out of my mouth for what they were, I heard, audibly, "I could teach him."  My own jaw nearly hit the floor.  Having been an outdoor educator out of college, I've always liked the idea of passing on knowledge of the world I know and love.  Soon a neighborhood kid, seventh grade and in the prime of his own awkwardness, started showing up at the shop.

The first time he came he was escorted by that good parent, by that sense of obliged fatherly duty that precedes willingly pawning your only son off on a total stranger.  We talked about the bikes in my fleet as I sussed out his existing premonitions about those bikes.  I'm having a hard time recalling the house fleet at the time, but I remember being impressed by his recognition of my same crudely-finished touring bike for what it was, 29x2.35s and all.  As one who started working in bike shops at an age not much older than this shy kid, I don't think I would have know what I saw before me were I in his position.  That day ended with an agreement; a loose but ongoing weekend commitment to teaching and learning in the bicycle world.  An internship was born.


Early assignments were generally the dissection of bikes; at that point I took on a good bit more repair work and general bike wrenching than I have in recent years.  Learn what you can from taking the right pieces apart, then reassemble to your level of comfort, and let me pick up the rest.  Knowledge gained one would hope.  After a few months of service though, the fleet in the other room brought more stares and wanderlust than anything I could offer through rusty old repairs.  With a commitment as loose as ours, the wanderlust was passable enough.  Dreamers are welcome with the least degree of help required....as long as they're nice and respectful.  A day came when this middle school kid showed up with a big wild smile on his face.  He eagerly pulled a $100 dollar bill from his pocket and said "I want a bike."  I knew where that money came from and it wasn't from cutting grass.  Kids don't do that here...there's no grass to be cut.  I told him to give it back to his mom.  If you want a bike, you can work for one.  At that point the formalities began.  The resulting projects have been going on for, at this point, a majority of the time I've spent in my current shop space.

I told the intern he could work for a frame...one of his choice, built to suit his needs.  His time would be valued at minimum wage for materials compensation, and his labor compensation would be valued as one adult working month, 160 hours for him to keep track and deduct from his own ledger.  He was told that if he were working for this bike it wouldn't all be in the face of learning bikes, and that sometimes this work would not be glamorous.  Sometimes it would be the wood pile, sometimes worse.  He excitedly signed the name to the top of his time ledger "Jaccb." And thus began the years of ridicule  that followed.  Upon being granted this opportunity, he thought his time of completion would be that very summer, before entering the 8th grade.  I smiled and nodded disapprovingly, a gesture that would get ingrained into my muscle memory in the years to come.  Jaccb had never worked for a thing in his life; this thing was going to count.  


I can't entirely recall all the projects over the years.  They ranged from polishing the cabinet beneath the surface table, to disassembling and reassembling the shop space, to rebuilding my personal bikes throughout their various configurations I don't know how many times, to cutting up rags, to the wood pile.  Jaccb recently recounted his hardest day to me recently.  He showed up and I asked him if he'd eaten breakfast.  Cereal he said.  I shoved a plate of hashed browns in his face and told him to eat up, he'd need it.  We loaded up the chainsaw in the Volvo and went out to cut firewood.  He got a briefing on saw and scene safety and stated hauling the logs to the car.  Years later he recounted that day as one of the hardest he's had to date in his life....I nodded my head disapprovingly then, I nod disapprovingly now.

Over the months that followed our agreement I could see Jaccb's interest start to wane as his efforts peeled hours back by the single digits.  The realization of the actual time required for this payoff, began to set in by his eighth grade winter.  Ski season became more appealing than that unrewarded time spent slaving away cutting up rags in that cold shop underneath those beautiful bikes he wanted so bad to call his own.  Times between seeing Jaccb were, varied and could span months.  I would try to save him meaningful work that I thought would be in his interest and skillset, but eventually the work would need to get done.  My own availability would begin to change as well.  I started taking on other side jobs as riding the wave of Forest Service savings began to stifle my living situation.  Weekends were harder to come by, but Jaccb would persistently pull those ones and twos off his ledger as the months went by.  At one point a whole year passed without seeing my intern (to fault us both), I did hope that our agreement was not a lost cause.

We began to find our groove again when Jaccb was in his Junior year.  He had taken a job at Huppy Bar, and was saving for the parts he'd use to build his bike.  He began to realize his timeline.  I began to realize the commitment I had made to serve my intern's skillset.  It seemed unlikely that building a frame on his own would result from our agreement, but I was still optimistic that our time would provide him an insight into the skills required of a shop setting, and allow him to explore some of those specifics under his own artistic creativity.  He is quite an artist after all.  


My list of shop improvement projects grows longer by the day and rarely shorter, but this seemed to be a good proving ground for the intern.  I had him pick one...he chose the sign.  I've been in need of a sign for a long time for shows and for the shop's character.  We committed to this and I went shopping for materials.  Oak plywood and a crash course in power tools.  He completed a rough outline of the shape in cardboard, and set that to the plywood.  I think in the end he was blown away by just how long something that seemed so simple could take.  But persistence and diligence carried him through his efforts.  I can't recall how many times the words "I'm scared" were uttered from Jaccb's mouth.  To me this meant it was not all lost, that this effort could be in fact working.  He was scared to lose the time invested into his workpiece, a sign of pride in his own sweat and his will for that work to be good enough for my continued investment.  He finished the sign with roughly 40 hours left on his ledger, and I told Jaccb that his last 40 could be spent working on his own bike.  

By this time his project was penciled in his own mind.  He'd still have to make the decisions on geometry specifics though I let him choose up front whether he wanted to make "his" bike or "my" bike.  If he wanted to adorn the frame he'd worked for with with the moustache on the head tube, it would ultimately be subject to my design approval.  With this he made a wise choice to differ to hands on experience over what's trending in the magazines.  Within that construct Jaccb wanted something timeless, something outside the reach of his existing bike fleet (teenagers with bike fleets.....sigh), but something that would work within his preferred riding style.  Something that would take him to new places and farther distances than any bike before.  He opted for the rigid for its pure soul and dedicated character.  Keeping to the paint schemes familiar to this shop he designed a bike to the basic aesthetics of the Camper Special, but the geometry favors a bit more aggressive riding rather than all day slogs.  Its longer and lower, the rear end is shorter.  It is designed around a Maxxis Rekon 2.8" rear tire rather than the 3.0 of the Camper Special.  If favors a lower handlebar for a rider with a more flexible body and longer arms.  Before this bike Jaccb had never realized that a given bicycle rider might fancy a given seat height between bikes (my thought:  "I must have failed you, intern").  So this is his first bike to consider seat height in the overall setup.  Whoa.


As we worked through the project, the parts started massing.  Jaccb built his own wheels (his first set), did all the drafting work, metal prep, some milling, some drilling, some mitering, plenty of math.  He dropped things.  Expensive things.  He professed those things as being "OK" despite having absolutely no idea.  He carved out the head badge, and generally stood guard as the pieces and his patience started coming together into something more tangible.  Finally.  It was becoming my debt to pay rather than his to earn.  The finish work is his own, save for a few touches I just couldn't let slip through the cracks.  After staring off into that sea of beautiful bikes hanging in the fleet, practicing a bit, and mostly just a lot of idle waiting, this is how the intern builds his bike, right down to the color and post paint work.  I had the privilege of supervising as this bike got built up the day before Thanksgiving.  We spent the day, despite me having heard the hurry up spiel multiple times from the now overly-anxious intern.

The sun had set before the once prototype XTR brakes were bled and the final bolts checked for tightness.  Jaccb sent out the door.  Some time had past before his enthusiastic return and proclamation of perfection.  It was a lengthy and proper late fall test ride.  I asked for my spin.  I was impressed too.  For being a bike that pushed my comfort zone a bit in terms of design balance within a riders perceived desires and actual abilities, I was pleased that a bike as long and low as this one felt so....shreddy.  It steers with a quickness that you'd want in a rigid bike but feels planted and stable so that corrections aren't a constant.  Accelerations are snappy and despite a rugged build, the bike keeps an overall feeling or light nimbleness that felt refreshing.  I hope for an extended test ride.  Good thing we didn't end up building this bike that summer of eighth grade, I have a feeling it would have turned out a lot differently!  


Jacob's own words from his Thanksgiving Day ride freshman year of college:

"Ride report!  This is the only bike I've been n that feels right on the first ride; the handlebars and where the wheel sits makes a super comfortable ride I get along with perfectly.  Its super nimble, easy to throw the rear around and put it down right where you want it for maximum pump.  I was definitely not any slower than I would be on my Chromag and I didn't have any problem doing the same lines.  It climbs very well and super comfortably.  I had the front tire at about 17 at the beginning of the ride which bounced me everywhere and it made it very difficult to hold a line but dropped it down to about 10 and that feels perfect, it handles the rough very well.  The long front end and the rigid fork does make it harder to bunnyhop but I'll get used to it.  I am so stoked on this bike and it came together perfectly, absolutely nothing I want to change about it.  I also test fitted my bags last night and the seat bag will work with the dropper but only gives me a few inches of drop before the collar but its enough drop to help with long tours, no problem with it hitting the rear wheel.  The crossed braced handlebars give the handlebar bag a nice wide platform and keeps it super secure.  Love all the parts we picked out and the gearing is perfect.  Thank you so much for this amazing opportunity Richard, it has been such a great experience and I learned a ton.  The bike is just a fraction of what I got out of this.  Can't wait to ride with you!"


Nodding, this time approvingly.  


Friday, October 27, 2017

Heidi's Packed Plusser


Oh Shit I said it.....or I typed it....right there in the title....the "P" word.  Before long I'll be throwing around other lay terms like "boost" and all the other adverbs and adjectives surrounding all the dubious marketing brought to you by the likes of those that need to sell a few more bikes this year.  Before I even realize I'll be answering the generally innocent question "Is that a boost plus bike?" with a perfectly frank "Yes."  Dread.  Terror.  What has this webspace become?


Taking on this project was about as big of a pill for me to swallow as the marketing jargon of the present day industry.  I'm sure there are bikes at least somewhat like this in size available on sales floors around the world, but when a smiling and excited customer standing 5'2" shows up wanting the full gamut of options whipped together in a trail-ready bikepacking format with maximal suspension travel, I tend to raise my eyebrow before agreeing to such a project.  This one needed some research and design work up front to make sure all the requests would (quite literally) fit the order.


The order was for a bikepacking rig with 120mm front suspension, clearance for 27.5x2.8 (plus...there, see that!) tires, dropper post,  rear rack provisions, 2x drivetrain, all while keeping the resulting frame as light as feasible for the duty load.  Sounds quite a lot like the bikes I've been building of late until you start to consider that all these provisions must fit onto a frame whose rider is 5'2".  The first consideration for me when taking on a project is ride quality.  There can be no compromises here.  If customer requests add up to a package that I think will in any way provide a less than stellar ride I say no...simple as that. 


The first order of business was to measure her existing bike in a consultation setting and determine any changes that would be made.  Her existing ride was a Small size Transition Scout.  While it looked as though it was a lot of bike for her frame, she seemed to like it and a later ride would show me she was quite able to throw it around despite its heft.  Next a scale drawing was rendered to make sure that a fork and wheel of that size would fit into Heidi's new cockpit with an appropriate bottom bracket height, seat angle, and handlebar position, while still having room to attach the top and down tubes to the head tube.  For a given set of contact points, losing the rear suspension and travel reduces the available space for which to place a front triangle as the static bottom bracket height (and therefore the rider's height off the ground) is lower relative to the full suspension.  Keeping all else equal, placing contact points onto the lower BB height eats up space in the head tube and I'd need at least 100mm of oversize head tube to join the top and down tubes.  120mm would be the max fork travel and would allow her to keep a handlebar level to her established saddle height using a flat bar and a 100mm head tube.


With the cockpit and contact points a go, I accepted the project.  The details were far from being worked out, but as the parts were provided, one problem was solved at the time.  Since the front end was established the rear end was the next to be considered.  This is really the only part of the frame that is three dimensional, but all the parts specifications, bends, and tolerances need to add up exactly.  After watching Heidi ride and considering how this bike was to be used, I determined that a short stay was not going to offer her the benefits that others may see.  The yoke I use to tuck rear ends in tight and keep maximal tire clearance adds a half pound to the frame weight, and the benefits didn't outweigh the costs on this frame.  The chainstay length could kept be the same as Heidi's existing bike without a yoke or curved seat tube, and the seat tube angle would be 3 degrees slacker (73 degrees instead of 76) placing her seated weight further toward the rear axle.  This configuration at a horizontal chainstay of 425mm would allow plenty of clearance for a Maxxis 27.5 x 2.8" tire with a boost spaced double front chainring.


The boost spaced crankset was mated to a 157mm thru axle rear end to give the best possible chainline with slight favor to the lowest gears.  When drawn out and measured the boost 148 rear hub is better served to give an improved chainline with a standard spaced crankset.  How is this and who am I to make such a claim you might ask?  Well, I measured the parts in hand...several times...and yes I saved my work.  I feel a better explanation is due; perhaps another blog post is coming on, but in essence MTB chainlines haven't measured out to match between cranksets and cassettes since we ran 2.1" tires and square taper bottom brackets...


The rear end was assembled keeping a close eye on clearances.  A large diameter and wide rear tire, a disc rotor, a double chainring crank, a front derailleur, a dropper seatpost, and a rear rack all need to fit into this space, and on this bike that space is a lot more compressed than on others.  Plate style thru axle dropouts were chosen to keep overall rear end width to a minimum with the wider rear hub.  The seat stays extend directly from the plane of the top tube and, as the seat tube is as short as it is, those stays attach a little more forward into the top tube than usual, maintaining the space for the seat stay bridge.  


The finished product is what you see.  The color fades from dark metallic blue at the head tube to dark metallic green at the dropout...and the finish was aced out by Nick at Mountain Shine Finishing here in Flagstaff.  He's gotten really good with the fades.  I sent Heidi out the door on this bike a few months ago, that ought to say how behind I am on these blog posts.  She's been out shredding the west, but I had a chance to catch up with her this fall and to hear her thoughts about her new steed.  Her first comment was, "Sometimes I forget which bike I'm riding."  Well considering her other bike is a Transition Scout, I'll take that as high praise, THANK YOU!  On a ride shortly thereafter, the review fell as the words "I love this thing!"  


From my perspective: its rare that I get to make a bike in this size range, especially one that asks all the demands that this one did, and that said I have no personal tangible way of knowing how this bike will ride save for rider feedback.  My designs originate from years (over 20 at this point) of studying bicycles, particularly mountain bikes, from comparative analyses of geometry tweaks between bikes or all sorts, and from watching riders ride bikes in demanding conditions.  We can't push design forward without pushing limits of these machines in use, and with that evolution in machine comes evolution in the canvas of terrain.  Today bikes (particularly hardtail bikes) are being ridden on terrain I would have never thought possible 20 years ago, or even 10 years ago, and Northern Arizona continues to open my eyes to what is possible on a bike.  Thanks, Heidi for this project, and for allowing me to continue to push my limits as a builder.


Sunday, July 30, 2017

Camper Special


Bike packing is all the rage these days....I guess that's what its called now.  There are companies out there specifically taking on and marketing to people pursuing this activity.  I've always just know this means of travel as "touring".  Going for a tour means freedom from plans and embracing the unknown.  Anything can happen.  Your only resources are yourself and your buddies and what you have on hand in any given moment.  To me "bikepacking" sounds like an activity based on a plan, but a Tour implies the pursuit of freedom from.  I guess somewhere they meet in the middle and I suppose that middle is your vehicle.  Your trusty (we hope) steed.  I'm calling my new one "The Camper Special".  You know, like a '72 Chevy: Reliable, servicable, maybe not the most efficient thing ever created, but it always got the job done without so much as a hiccup, it probably even left you surprised once or twice about what you just got through.  The Camper Special was a parts and trim package offered by big three American auto manufacturers on their heavier 3/4 and 1 ton pickups from the early 1960s to the late 1980s.  Heavy Haulers.  Typically trucks bearing the camper special emblem had two-tone paint, upgraded brakes, axles, and wiring for towing or a drop-in tailgate camper shell.  Following in the footsteps dredged by internal combustion Americana, the Camper Special (bike) replaces a fuel hungry V-8 with an appetite for adventure and heavy human-powered hauling.


Conceptually this personal project has been in the works for over two years, but if you've been following along here over any length of time I'm sure there is evidence of many of the concepts in play coming into fruition well earlier than that.  Selection of parts and frame interface components was directed at keeping a functional timelessness to the package, as well as the ability for everything on the bike to just plain last under performance.  It has been my hope in the design to create a fully rigid bike that is equally at home maintaining comfort and strength on loaded multi-day, multi-week tours as it is on the gnarliest gravity-fed single-track northern Arizona has to offer.  Control and efficiency are the primary concerns here rather than speed.  Slow is smooth and smooth is fast.


The result starts by utilizing 650B x 3.0" tires (you could call them "plus" tires) on a horizontal dropout short-stay frame for adjustability between lines of duty.  The "Coco-Moto" dropouts (these are just lovely by the way) were pried from the very hands of Mr. Steve Garro himself as was one of his new custom drawn Columbus 38mm down tubes.  Bolt-on hubs meant retaining a 135mm outer lock-nut dimension, so the rear wheel was laced with symmetrically between the hub flanges kicking the cassette body out 7mm to the drive side for proper chainline when matched to a boost crankset on a standard 73mm BSA threaded bottom bracket shell.  The rear end of the frame is then built asymmetrically to accept this wheel.  Tire clearance on the short (420mm minimum) chain stay is accomplished by a plate yoke milled in house and a curved seat tube rolled across town.


Parts spec is pretty standard for one of my personal builds....a mix of what I have around, what I know works, and what I want to try out.  Race face cinch cranks get the nod for their flexiblity between 1x and 2x setups with proper chainline.  Touring I would expect to run a 2x front ring with a fixed seatpost, daily riding with a 30T 1x and a dropper post.  Drive train is 10 speed with X.0 gripshift, XT 36T cassette, and GX rear rock catcher.  A Hope bottom bracket, 4 piston brakes, and floating rotors are spec'd to try out.  Hadley hubs are laced to Syntace W40 rims with Trail Boss TCS tires.  A Cane creek ZS 110 headset, Thomson BMX stem, and house-made riser bar finish out the build.


 The dedicated rigid fork utilizes my own custom thick-walled, externally-tapered steerer tube and raked blades at 50mm offset.  Headset is straight 1-1/8" on a 44mm headtube allowing for a better join area to the 38mm downtube than would an external cup head tube.  I have not embraced the 1-1/2" tapered steerer for steel rigid forks as this is an excessively heavy piece of metal that cuts down on the surface area of the blade miter at the crown.  I find the steerer tube with a diameter matched to that of the crown area of the fork blade to be the most appropriate for brazing as the miter of the blade then wraps the steerer tube rather than being attached only to the side of it.  The whole area is then flooded with molten bronze creating a very strong joint.  Again, this is a rigid specific bike so swapping to other forks is not a consideration.  Rigid specific is the only way I build my forks as there are just too many compromises in anything else:  There are rigid bikes and there are suspension bikes....your choice, but the one bike that attempts to do both depending on the mood makes too many compromises to the ride of either bike's personality it is trying to emulate.  Basically:  Suspension correct is incorrect.  This fork will, however, accept a 29"x3.0" tire and wheel if I ever wanted to try it, though after initial rides I think this combination would unfavorably influence the steer-ability and climbing of this bike.


When it comes to gear hauling on a bicycle, I'm a racks guy.  Yes, there is the weight penalty.  Yes, they're expensive.  Yes, the soft packing setups these days are marvelous and if that's your thing, Great!  To me though you just can't beat the stability and overflow capacity offered by a good set of racks.  I accept the weight penalty.  I've never known how to pack light anyway.  I never know what I'm going to pick up at the next stop or where I might need to tie it on.  The racks for this bike are derived from personal touring setups on trips to Mexico, the Cascades, and the Colorado Trail, and offer refinements to the systems used on these trips.  I have always been a fan of the front (non-low-rider) panniers for how they balance the load and weight the front tire climbing.  Most of your time on a bike and especially on tour is spent climbing so the longer you can spend pedaling your bike without getting off to walk the more efficient your use of calories will be.  Every starting effort whether walking or pedaling with the kind of load I've been known to carry costs precious calories.  If your bike is still tracking, you just need to keep the pedals turning.  Easy enough, right.  The pit-falls of front panniers can be their general poochiness and flop.  Clips that aren't tight enough and attachment points that promote steering lag quickly degrade the benefits of where that weight is placed.  This is all highly noticeable when the terrain turns rough.  Everything secured to the front end of the bicycle should be as tight and as close to the steering axis as possible. 


This rack takes those points and makes some accommodations.  Clip on panniers are ditched in favor of standard 10 liter dry bags that are cradled by the rack then strapped to the side.  The rack's attachment points at the dropouts and above the head tube promote flex of the stays and damping through the load being carried while cutting down on braking flex in the fork.  The upper struts extending from the front platform serve to secure overflow loads to the steering axis without interfering with the cables.  This can also be used as a means to attach your backpack in less demanding terrain, a much needed relief at times.  The ability to transfer gear from body to bike depending on terrain is something to consider when heavy biking.  Hiking a steep grade or mountain pass is the time to carry weight on your back rather than pushing it on your bike, cruising a dirt or pavement stretch is just the opposite.  Your body will thank you.


The rear rack is a bit more of an experimental design in being a light weight top loader.  I carry my bedroll here and pretty much nothing else.  It could have been kept a bit more minimalistic, as my sleeping bag/pad weighs only around 5 pounds, but it seemed like a bit extra area for tie-ons would be useful leading to the lower structure below the platform.  My thought in keeping the attachment points forward of the axle is allowing the flex at the attachment points and through the stays to provide some damping control to the rear of the bike through the load on the rack.  The load carries its own inertia and in doing so works to resist the movement of the bike through the jarring of the rear wheel.  All hardware is 6mm stainless and frame attachments are backed with nylock nuts.  No attachment points directly on the frame or fork are threaded save for standard frame H20 boss placements, rear derailleur hanger, and bottom bracket shell.


I got the chance to take this bike on a shakedown ride for a week on the Kaibab North Section of the Arizona Trail, and since have managed a few rides on the trails around the shop.  This bike is a blast to ride.   I've found its confidence inspiring and feel as though I can hit the same downhill lines as with my 140mm hardtail at almost the same speed.  Steering is still quick and playful as I'd have it and the vertical inputs maintain a lively response.  Climbing is an improvement over that bike as expected.  I haven't felt a rim hit on the front rim in a while.  The tire pressure is a delicate balance on the TCS Lights and I'm thinking that I may favor some tires with a heavier casing down the road.  I had been thinking that the rear tire would see some rapid sidewall wear with a frequent occurrence around here being threading a rear tire between sharp rocks.  So far this hasn't seemed the case, but I have a 2.5" Breakout on stand-by.


An interesting point of discussion here for me is the stability of this bike.  It's not particularly low as I prefer pedal/chainring clearance and a higher center of gravity, though maybe a bit lower than others I've owned recently.  Apples to oranges; BB drop is 39mm.  This bike hits a marked point of straight line stability at around 6 MPH.  It'll steer out of it when you want it to keeping it fun.  I would have to guess that a fair bit of this is the volume and mass of the tires, but this bike stays glued to a straight line like nothing I've ever ridden.  I'm talking take your hands off the handlebars on the washboards to take pictures kind of stability.  Anyway,  its been a new excitement to get this bike rolling and dialed in, and I'm looking forward to some extended adventures on it in the coming months.  Thanks for following along....